A couple weeks back, we decided the pigs had done their job (aka tilling the ground and clearing out grass and roots for planting) in the kitchen garden, and it was time to move them to a new spot.
However, I had a problem.
This new spot was farther away from our sleeping spaces, on the edge of our frequented area. In all honesty, it isn’t THAT far away.
BUT. I worry about predators. Like a lot.
Pigs are not really susceptible to many predators, but mine are pot bellies. They each weigh about 30-50 pounds and could be taken down by large feral dogs or the coyotes we hear yipping at night.
Now that they were moving away from our safe zone next to our sleeping quarters, I decided they needed a hut that I could lock them into at night to make sure they are safe from any roaming canines looking for a snack.
Sounds pretty easy in theory, but I came up with a few issues while designing the thing.
First, the new pig hut needed to be moveable. I am so excited for the day the pigs have permanent pens and pasture during the day. But right now, they are in temporary housing while we prepare new gardens. Due to the frequency of their moves, this hut needed to move with them to each new location.
“Easy,” you might be thinking. Just make it lightweight.
Nope. Anyone who has ever tried to keep a pig in one place will tell you, pigs are STRONG.
Even my tiny pigs are very good at shoving, lifting, and muscling their way out of anything. Therefore, the hut needed to be equally strong to withstand their abuse.
Everything I could think of to build that would keep them in would be way too heavy to move short of machine power, or lots of guys to help.
And being a girl who is usually moving things alone, in places atv’s and tractors cannot reach, I couldn’t depend on any of those.
So, I built a pig hut that could be easily disassembled and moved in pieces, thus allowing me to move it myself. Pretty nifty.
This would be perfect for small pigs, or as a place to keep babies until they are big enough to fend for themselves. It could even be a great place for a couple of geese! So many possibilites.
It was a pretty easy build and took me a couple hours to put it together. I made it totally free by using pallets, scrap wood, and scrap tin. The only bought items were a couple dollars worth of screws, a pair of hinges, and a bolt latch. Obviously how much you spend will depend on what you have lying around your homestead. If you don’t have exactly what I used, get creative! Make it your own by using what you’ve got.

Step 1:
The first thing you need to do is find some pallets. We have nearly a hundred stacked around the property. You need pallets that are all pretty much the same size. The pallet used on the floor had closer slats. If you don’t have a pallet like that, you can add a piece of plywood or take off the slats and put them back on close together.

Step 2:
Next I screwed them together with long screws on each corner top and bottom. You want to screw them from the inside- remember, we need access to these screws whenever we go to move it, so put them in place you can get to them easily.

Step 3:
Once the pallets were solidly together, I added some tin to enclose the sides and back. I used random odd end pieces and screwed them in with self-penetrating roofing screws. Maybe not the most beautiful thing, but this worked great and keeps the rain from blowing in on them.

Step 4:
Next we need to build a front panel. I used scrap 2x4s, though you could also take apart a pallet and use that! I built the front panel exactly to the dimensions of the front opening. These dimensions will vary depending on the pallets you use, so be sure to measure carefully! I added a middle support piece off center to one side to accommodate a piece of plywood I would be using for the door. Again, change it up depending on what you have to use!

Step 5:
Now its time to finish the front and build a door! The small section to the left is simply scrap 2×4 ends nailed securely to the frame. This made for a very secure base to mount the hinges. You can also note on the right, I needed to add a 2×4 piece to bring the bolt latch and eyelet to the same level. This may or may not be necessary depending on the type of latch used.

As you can see here, the door is simply a piece of plywood. On the front it is faced with thin pieces of pine (for no other reason than to make it look better. Plywood is not the nicest looking thing ever). Hinges and a deadbolt then complete the front!

Step 6:
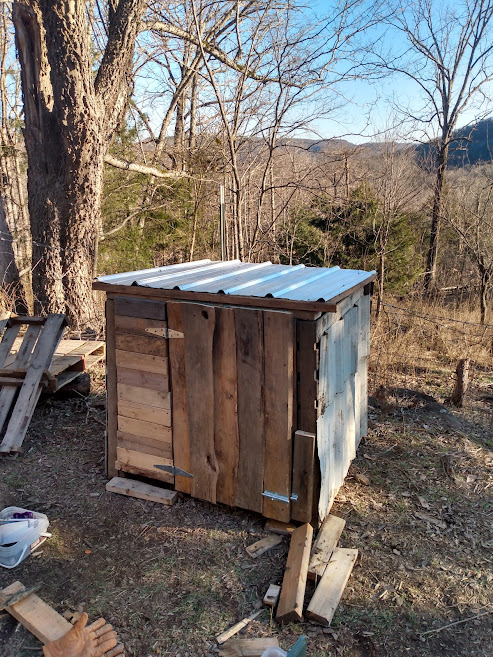
Finally, the new hut needed a roof! So I took some more of my trusty 2×4 scraps and built a simple square disconnected from the pallets. I screwed in a few pieces of tin, lifted it on top, and secured it to the structure with a long screw in each corner.

And viola! A safe and dry space for my little piggies to spend their evenings (and hot summer afternoons!)
If you’ve read this far, then you must be really interested in building something similar! So, you might ask, how has this held up? How do you move it? And is there anything you would’ve done differently?
Well thank you dear reader for asking!
I’ve been using this for about 9 months now, and thus far it has held up great! The pigs chewed a bit of plywood on the door, but it didn’t cause any major damage. I have moved it twice in that time frame, so here are a few things I would do differently if I made another.
- Use a different latch! The bolt is great and strong, but requires perfect alignment to work correctly. The pigs jumped on the door in their excitement a few times, and it tweaked the door just enough that it now won’t close without tugging and grunting! I will probably be changing the latch to a swivel hook and eyelet. This really is only an issue with pigs. If you are keeping something smaller and less destructive, this won’t be a problem for you!
- Use good screws! I recommend T-25 screws, as these seem the least likely to strip. You will be unscrewing certain pieces if you plan to move it, and I made the mistake of using some wimpy square bits, which stripped the first time I tried to take them out, and it was a huge hassle replacing them. So go for strong ones. I also recommend inspecting them each time you move the hut. If you notice one is starting to strip, replace it with a fresh screw.
- MAKE your tin roof LONGER than the hut! Those were pre cut end pieces from our cabin build, which is why i used them, but really you need an overhang on both the back and the front to ensure water doesn’t drip inside. This will make your wood last longer as well.
- Add a middle support to the top panel to support the tin. This doesn’t really affect performance when it’s all put together, but whenever I move the top panel it’s a bit flimsy. Another support beam would make it more sturdy.
As far as how to move it, it’s quite simple really! First, unscrew the top panel of tin and remove the whole panel. Next remove the panel, then separate each side wall. Now you should be left with a stack of individual panels! Move the bottom pallet first, and then reassemble the puzzle, being careful to put each piece back where it was before.
So there you have it folks!
I hope you enjoyed this post and maybe learned a little something, or got inspiration for your next homestead project!
Feel free to drop any questions or comments down below, and as always,
I hope you have a wonderful day!!